

This past weekend my boyfriend and I attended three weddings, one each on Friday, Saturday, Sunday. I’m still amazed about the smooth schedule and that we were able to celebrate with all three couples we love dearly.
It’s the norm here to gift money at weddings. It pays back part of the wedding expenses or helps the newlyweds towards a honeymoon. I know this is done differently elsewhere and whilst I’m not opposed to the concept as a whole I usually find myself wondering how to actually gift the money. Just putting it in an envelope seems kind of blunt.
Being a new quilter I really wanted to gift something handmade to go with and display the money. Here’s where the coasters come into play: quick and tiny, basically a quilt in a nutshell. That’s what I thought at least and plotted to make three sets of six each. It ended up taking a little longer, but I made my patchwork plans as I went, so that might be why.

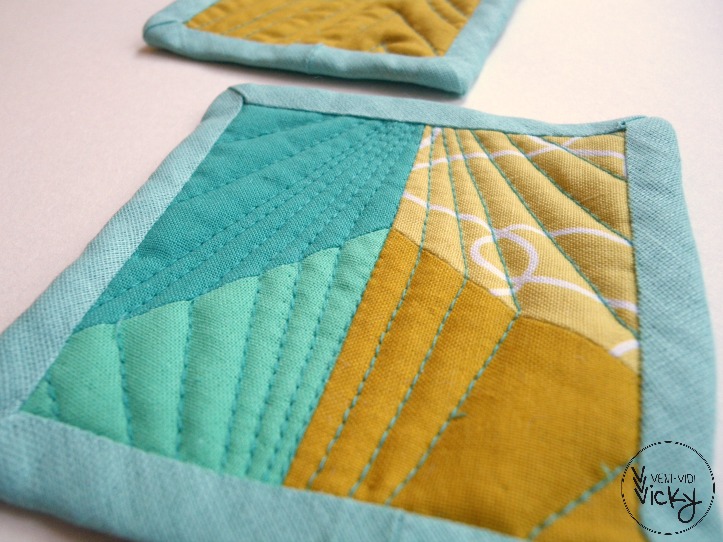
I used two Lotta Jansdotter prints (Mormor Beads and Mormor Whirl both in yellow), my favourite mustard and two teal solids and a bordeaux coloured fabric I had at hand as a colour pop. As time was a factor I picked a pretty versatile fabric combination and made all three sets from it. I might have personalised them to fit each couple’s style if I had planned a little more in advance…

- go simple when it comes to patchwork patterns. I wanted to try flying geese but quickly axed the idea when I saw how tiny they would have to be. My coasters finish at 4 inch * 4 inch, there isn’t a lot of space for patterns. I even like the simplest ones I made best: those just have a contrasting corner sewn to a solid ground.
A piece of batting quilted between two fabric charms would also work great, I think! - improv piecing, try it! You can make your coasters all from scraps and don’t have to worry about blocks working together etc. I had a lot of fun doing this!
- The coasters can be used from both sides, make sure the backsides look neat! This also offers the opportunity for two designs per set to be used at different occassions / with different tableware.
- Don’t underestimate the binding. The coasters are tiny quilts, but binding lenghth isn’t proportional to square footage. With a 4 * 4 inch coaster you still have to bind 16 inches which adds up to 96 inches for a set of six coasters!
I’m considering not to bind them at all next time, but to sew the layers right sides together, then pull the right sides out and quilt. Another solution to speed it up would be to machine finish the binding, but I fear the additional seem is too prominent on such a small scale. - There’s no better way to try different quilting shapes than using a small tester sandwich. Why not make it into a coaster? I found it to be a great project for testing some new-to-me straight-line quilting ideas.
- While you’re at it, make a few spare coasters to put away and you won’t run into that emergency-gift-needed-immediately situation anytime soon.


And here’s how I made the coasters and the money into a gift a lot nicer to look at than an envelope:

I hope you’ll enjoy making your coasters just as much as I did!


Hallo Vicky,
das ist ja mal eine ganz tolle “Mitbringsel-Idee”.
Vielen Dank auch für Deinen Kommentar bei meinem “geflochtenen Läufer”.
Den hab ich mir anhanddes Fotos von dem eingestellten Link selber entworfen.
Das schaffst Du auch ;-).
Liebe Grüße
Bastelhexe-Barbara
Hallo Barbara, habe erst beim zweiten Blick entdeckt, dass du Schrägband aufgenäht hast. Super! Probiere ich auch mal aus =)
[…] my post about the bulk coasters production I had going on in August I reflected on some improvements I planned on making the next time. Well, […]
Great scrappy project and gift! Thanks for linking to Scraptastic Tueday!
I have made coaster using scraps before but didn’t use binding. Your ones look lovely.
Cute idea. I’m sure it was a hit!
Lovely gift idea!
These are lovely. I’m sure they will be glad to receive such a cute gift.
Your coasters are beautiful. A really lovely gift. I don’t bind coasters either, for the reasons you said. I sew right sides together and turn and stitch around the edge for a nice edge then quilt them.
What a fabulous idea! Love the idea of using scraps for this.:)
These are wonderful!!!
[…] girly friend) | | flying squirrel softie (for a little one) | paper plane pillow (with tags!) | | scrappy coasters […]
Great blog I enjoyed reeading